Building an Intelligent Customer Service Robot Using AI API: A Complete Practical Solution
Intelligent customer service robots are one of the most common application scenarios for AI APIs. This article will guide you from scratch to build an intelligent customer service system that supports multi-turn conversations, knowledge base retrieval, and streaming output.
Why Use AI for Customer Service
Traditional customer service systems face several core pain points:- High labor costs: 7x24 hour coverage requires a large workforce
- Slow response speed: Waiting in line during peak hours affects user experience
- Inconsistent knowledge: Different agents have inconsistent responses
- Cannot scale: The customer service team struggles to expand synchronously with business growth
System Architecture
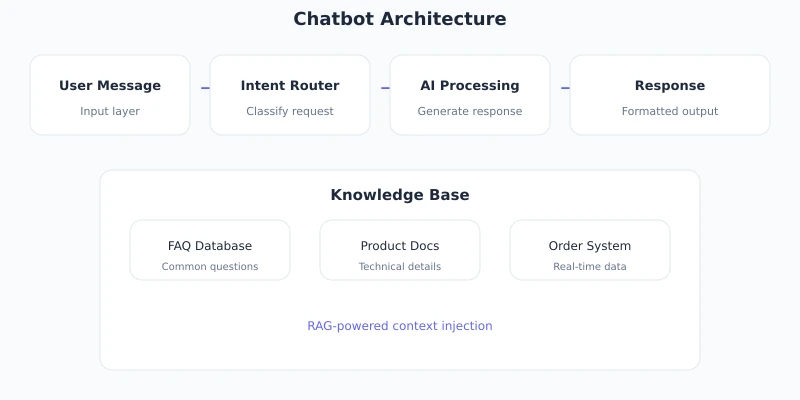
A complete AI customer service system includes the following components:
| Component | Responsibility | Technology Choice |
|---|---|---|
| Frontend Interface | User chat entry point | React / Vue / Mini Program |
| Backend Service | Business logic, session management | Node.js / Python / Go |
| Knowledge Base | FAQ, product documentation | Vector database / local files |
| LLM API | Natural language understanding and generation | Ciyuano API |
Basic Implementation
1. Initialize Client
from openai import OpenAI

client = OpenAI(
    base_url="https://www.ciyuano.com/v1",
    api_key="sk-your-api-key"
)
2. Define System Prompt
The system prompt determines the role, tone, and behavioral boundaries of the customer service agent:
SYSTEM_PROMPT = """You are「Ciyuano」's AI assistant。

Your responsibilities:
1. Answer user questions about API integration、pricing、model selection issues
2. Help troubleshoot common integration issues
3. For issues that cannot be resolved,Guide user to contact human support

Rules:
- Only answer questions related to Ciyuano products
- Don't fabricate uncertain information,Inform user confirmation is needed
- Answer concisely,Avoid verbosity
- Answer in the user's language"""
3. Implement Multi-turn Conversation
class CustomerServiceBot:
    def __init__(self):
        self.client = OpenAI(
            base_url="https://www.ciyuano.com/v1",
            api_key="sk-your-api-key"
        )
        self.conversations = {}  # session_id -> messages

    def chat(self, session_id: str, user_message: str) -> str:
        # Get or create session
        if session_id not in self.conversations:
            self.conversations[session_id] = [
                {"role": "system", "content": SYSTEM_PROMPT}
            ]

        messages = self.conversations[session_id]
        messages.append({"role": "user", "content": user_message})

        # Call LLM
        response = self.client.chat.completions.create(
            model="deepseek-v4",
            messages=messages,
            temperature=0.3,
            max_tokens=1000
        )

        assistant_message = response.choices[0].message.content
        messages.append({"role": "assistant", "content": assistant_message})

        return assistant_message
RAG Knowledge Base Retrieval
Relying solely on the general knowledge of LLMs cannot answer business-specific questions. RAG (Retrieval-Augmented Generation) solves this by first retrieving relevant documents and then having the LLM generate answers based on the retrieved results.
Knowledge Base Construction Process
import numpy as np

class KnowledgeBase:
    def __init__(self):
        self.documents = []
        self.embeddings = []

    def add_document(self, content: str, metadata: dict):
        """Add documents to knowledge base"""
        embedding = self._get_embedding(content)
        self.documents.append({"content": content, "metadata": metadata})
        self.embeddings.append(embedding)

    def search(self, query: str, top_k: int = 3) -> list:
        """Retrieve most relevant documents"""
        query_embedding = self._get_embedding(query)
        similarities = [
            self._cosine_similarity(query_embedding, emb)
            for emb in self.embeddings
        ]
        top_indices = np.argsort(similarities)[-top_k:][::-1]
        return [self.documents[i] for i in top_indices]

    def _get_embedding(self, text: str) -> list:
        """Get text vectors"""
        response = client.embeddings.create(
            model="text-embedding-3-small",
            input=text
        )
        return response.data[0].embedding

    def _cosine_similarity(self, a, b) -> float:
        """Calculate cosine similarity"""
        return np.dot(a, b) / (np.linalg.norm(a) * np.linalg.norm(b))
RAG-Enhanced Conversation
def chat_with_rag(self, session_id: str, user_message: str) -> str:
    # 1. Retrieve relevant knowledge
    relevant_docs = self.knowledge_base.search(user_message, top_k=3)
    context = "
".join([doc["content"] for doc in relevant_docs])

    # 2. Assemble prompt with knowledge
    enhanced_prompt = f"""{SYSTEM_PROMPT}

The following is relevant information retrieved from the knowledge base,Please answer user questions based on this information:

{context}
"""

    messages = [
        {"role": "system", "content": enhanced_prompt},
        {"role": "user", "content": user_message}
    ]

    # 3. Call LLM
    response = self.client.chat.completions.create(
        model="deepseek-v4",
        messages=messages,
        temperature=0.3
    )

    return response.choices[0].message.content
Streaming Output
Streaming output allows users to see a "typing effect," greatly improving the waiting experience:
def chat_stream(self, session_id: str, user_message: str):
    """Stream response,Output character by character"""
    messages = self._get_messages(session_id, user_message)

    stream = self.client.chat.completions.create(
        model="deepseek-v4",
        messages=messages,
        temperature=0.3,
        stream=True  # Enable streaming
    )

    full_response = ""
    for chunk in stream:
        if chunk.choices[0].delta.content:
            token = chunk.choices[0].delta.content
            full_response += token
            yield token  # Stream to frontend character by character

    # Save complete reply to session history
    messages.append({"role": "assistant", "content": full_response})
The frontend receives streaming data via SSE (Server-Sent Events):
// Frontend JavaScript
async function sendMessage(message) {
  const response = await fetch('/api/chat', {
    method: 'POST',
    headers: { 'Content-Type': 'application/json' },
    body: JSON.stringify({ message })
  });

  const reader = response.body.getReader();
  const decoder = new TextDecoder();

  while (true) {
    const { done, value } = await reader.read();
    if (done) break;

    const text = decoder.decode(value);
    appendToChat(text);  // Display character by character
  }
}
Model Selection Recommendations
| Scenario | Recommended Model | Reason |
|---|---|---|
| Simple FAQ Q&A | Qwen Plus | Low cost, fast response |
| Complex Business Consultation | DeepSeek V4 | Strong reasoning ability, good Chinese |
| Requires Tool Calling | MiMo v2.5 PRO | Good Function Calling support |
| Cost-effective Priority | MiMo v2.5 | Limited time free |
Optimization Suggestions
Session Management
- Set session expiration time (recommended to auto-close after 30 minutes of inactivity)
- Limit historical message rounds (recommend retaining the last 10 rounds) to avoid token overflow
- Summarize and compress long conversations, keep key information
Prompt Optimization
- Define role boundaries: tell the model what to answer and what not to answer
- Provide Few-shot examples: give standard Q&A pairs to unify the response style
- Set fallback strategy: when the model is uncertain, guide the user to contact human service
Cost Control
- Use small models for simple questions, large models for complex questions (routing strategy)
- Set max_tokens to limit output length
- Cache responses for repeated questions
Complete Example Code
Below is a complete example that can be run directly:
from openai import OpenAI

client = OpenAI(
    base_url="https://www.ciyuano.com/v1",
    api_key="sk-your-api-key"
)

SYSTEM_PROMPT = """You are an AI assistant,Be concise、accurately answer user questions。"""

def chat(user_message: str, history: list = None):
    if history is None:
        history = []

    messages = [{"role": "system", "content": SYSTEM_PROMPT}]
    messages.extend(history)
    messages.append({"role": "user", "content": user_message})

    response = client.chat.completions.create(
        model="deepseek-v4",
        messages=messages,
        temperature=0.3,
        stream=True
    )

    full_response = ""
    for chunk in response:
        if chunk.choices[0].delta.content:
            token = chunk.choices[0].delta.content
            full_response += token
            print(token, end="", flush=True)

    history.append({"role": "user", "content": user_message})
    history.append({"role": "assistant", "content": full_response})
    return full_response, history

# Interactive conversation
if __name__ == "__main__":
    history = []
    print("AI assistant started,Input 'quit' Exit
")
    while True:
        user_input = input("User: ")
        if user_input.lower() == "quit":
            break
        print("Support: ", end="")
        response, history = chat(user_input, history)
        print("
")
Summary
The core steps to build an AI customer service system:
- Choose an API: Register with Ciyuano, get an API Key
- Design the prompt: Define the role, responsibilities, and answering rules of the customer service agent
- Implement conversation: Multi-turn conversation management + streaming output
- Integrate knowledge base: RAG retrieval augmentation to answer business-specific questions
- Continuous optimization: Adjust prompts and knowledge base based on user feedback
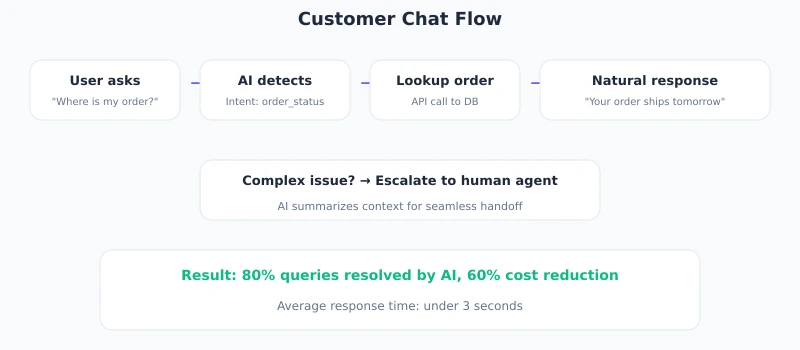
The entire process requires only a few dozen lines of Python code, combined with the Ciyuano API. For small and medium-sized businesses, this solution can cover more than 80% of customer service scenarios.
Next Steps: Try integrating Function Calling to enable the customer service bot to perform practical operations such as checking orders and logistics.
Related Articles
Building a Multi-Model Intelligent Gateway: Ciyuano's Technical Architecture Revealed
Deep dive into Ciyuano's core technical architecture: underlying implementation principles of multi-model intelligent routing, health checks, failover, and real-time billing.
Dev PracticeBuild a DeepSeek chatbot using Streamlit and Ciyuano
Build a complete AI chat web application with Streamlit in 30 minutes, supporting streaming output, conversation memory, and multi-model switching. Entirely pure Python, zero frontend code.
Dev PracticeHands-on AI Agent Development: Building Autonomous Decision-Making Agents
Build an AI Agent from scratch with tool calling, memory management, and autonomous planning capabilities, covering mainstream frameworks such as ReAct and Plan-and-Execute.
Comments are not yet available, stay tuned