OpenAI API Integration Guide: Add AI to Any App in 3 Steps
Don't want to rely on other people's apps? Want to call AI directly from your own application? This guide will walk you through integrating with an OpenAI-compatible API step by step. Add AI capability to any program in just 5 minutes.
What Is an API and Why Integrate?
An API (Application Programming Interface) is simply a "communication window." You send your question through this window to AI, and AI sends the answer back.
Imagine ordering at a restaurant: the API is like the waiter. You place an order (send a request), the kitchen prepares the food (AI generates a response), and the waiter brings it to you (returns the result). Once integrated, your website, mobile app, or even a simple script can all use AI as a tool.
Why recommend Ciyuano's API service?
- OpenAI-compatible format: All tutorials, tools, and code built for OpenAI work directly—no new syntax to learn
- Rich model selection: GPT-4o, DeepSeek, Qwen, and other popular models available in one place
- Transparent pricing: Pay per token, only for what you use—no waste
- Simple to call: One HTTP request does it all, much easier than configuring environments or installing GPUs
Integration Flow Overview
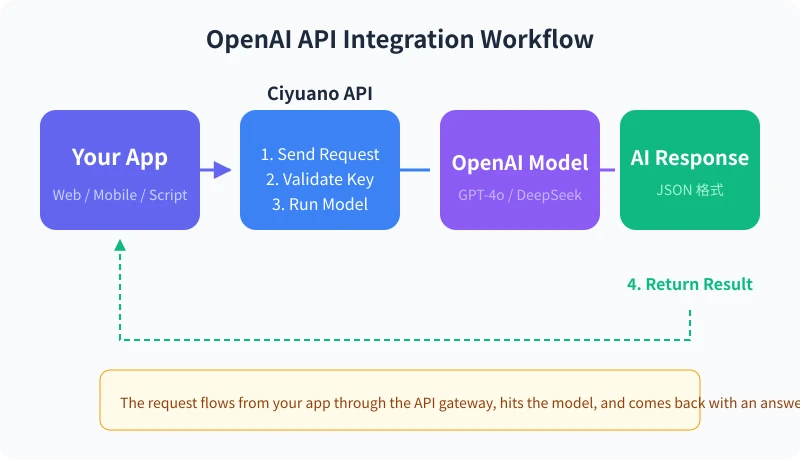
The whole process is just 4 steps, simpler than signing up for an account:
- Send Request: Your app sends the question to Ciyuano's API endpoint
- Validate Key: The API checks if your API Key is valid
- Run Model: Once validated, the large model generates a response
- Return Result: AI's answer is sent back to your app in JSON format
Step 1: Get Your API Key
Just like using a bank card, you need one first. Getting an API key follows the same pattern.
- Open your browser and visit www.ciyuano.com, then register or log in
- Go to your dashboard and click "API Keys" in the left menu
- Click "Create New Key"
- Give your key a name, for example "My Test Key", for easier management later
- The system generates a key like
sk-relay-xxxxxxxxxx - Copy and save it securely. The key is only shown once. If lost, you'll need to create a new one.
Important: Never share your API key publicly, don't commit it to GitHub, and don't tell strangers. Your key is like your account password—if leaked, others can use your quota.
Step 2: Send Your First API Request
With the key in hand, you can start making requests. Below is a cURL example—one command gets you an AI response.
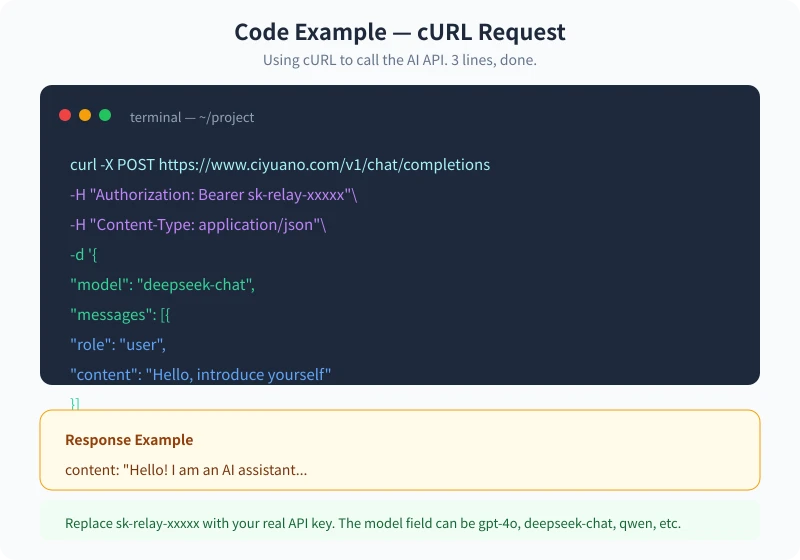
Field explanations:
- URL:
https://www.ciyuano.com/v1/chat/completionsis the fixed endpoint. All OpenAI-compatible services use this path. - Authorization: Put your API key here, formatted as
Bearer sk-relay-xxxxx - model: Choose your model. Recommended:
deepseek-chatorgpt-4o - messages: The message you send to AI.
role: usermeans it's from you.
After running, you'll see a response like this:
{
  "choices": [{
    "message": {
      "role": "assistant",
      "content": "Hello! I am your AI assistant. Nice to meet you. How can I help?"
    }
  }]
}
Success? If you see an AI response, congratulations! You've successfully integrated an AI API. From here you can do anything you want: write articles, translate, code, chat, analyze data…
Step 3: Use It in Common Scenarios
Scenario 1: Website Integration
Want to add an AI chatbot to your website? Just send a request to the API when the page loads and display the result to users. No deep learning required, no GPU needed—a normal server is plenty.
Scenario 2: Mobile App
Calling an API from a mobile app is the same as from a website. Write a short HTTP request in your app code, send the user's input to Ciyuano API, and display the result on screen.
Scenario 3: Automation Scripts
Write a Python or Shell script that lets AI summarize news, translate documents, or generate daily reports on a schedule. Wake up every morning and AI has already prepared the day's information for you.
Frequently Asked Questions
Q: Is there a free quota for API calls?
Ciyuano provides a starter quota when you register, allowing free trials for a period. Top up as needed once the quota runs out.
Q: What if a request fails?
Three common causes: first, the key is wrong; second, the model name is wrong; third, insufficient balance. Check the key first, then confirm the model field is in the supported list.
Q: Can I call multiple models at the same time?
Yes. All models share the same quota under one key. You can switch between different models across different requests.
Q: How is security guaranteed?
Ciyuano uses HTTPS for encrypted transport and stores API keys with bcrypt salted hashing. Keys are only created and viewed through the admin dashboard—never exposed to third parties.
Summary
Integrating an OpenAI-compatible API is just three things:
- Register an account and get an API key
- Send an HTTP request with the key and your question
- Parse the response and display it to users
From registration to your first working call, it takes as little as 5 minutes. AI isn't some mysterious technology—it's a tool you can call anytime. Go ahead and start using it.
Related Articles
AI 帮你写简历:从零到专业,五步搞定求职利器
不管你是应届生还是职场转行,AI 都能帮你把简历从"凑合能用"变成"眼前一亮"。本文用五个步骤,手把手教你用 AI 生成、修改、优化出一份真正能拿面试的专业简历。
AI 语音转文字:零基础实操指南,三步把说话变成文字
还在打字到手指发酸?还在为会议记录发愁?AI 语音转文字技术已经非常成熟,学会使用它,可以帮你把说话直接变成文字,效率提升数倍。本文将手把手教你选择工具、完成转写、导出使用,让 AI 成为你的打字替身。
Tech FrontierAI 提问技巧入门:让 AI 回答更准确的 7 个实用方法
明明 AI 功能强大,但每次提问得到的回答都差强人意?其实问题往往不在 AI,而在于你提问的方式。本文用最直观的方式教你 7 个让 AI 回答更准确的实用技巧,包括四要素公式、精准提问、背景信息、拆分任务、追问迭代、万能模板和常见错误,小白也能立即上手。
Comments are not yet available, stay tuned