AI Mobile Photography Assistant Practical Guide: Composition Tips, Scene Optimization, and Post-Processing All in One
Why do your photos always feel "just not quite right"?
Many people's photo-taking process is: take out phone → aim at subject → press shutter. The result is either crooked, dark, or the subject isn't prominent, or the background is too messy. Actually, the problem isn't that your phone isn't good enough, but that you lack two things: composition awareness and post-processing.
The good news is that AI tools can greatly help you in both areas. They can tell you how to compose, how to adjust settings, and even fix your photos to their best state with one click. This article will guide you step by step on how to use AI to take your phone photography to the next level.
Step 1: Learn composition with AI
Composition is the primary factor in whether a photo looks good. You don't need to memorize complex photography theory; just master three most practical composition rules:
Rule of thirds
Turn on the grid lines on your phone camera (Settings → Camera → Grid), and the frame will be divided into 9 squares. Place your subject on the intersection points of the grid lines, not in the center, and the photo will immediately have more depth.
When shooting portraits, place the eyes on the upper third line; when shooting landscapes, place the horizon on the lower third or upper third line.
Leading lines composition
Use lines in the scene (roads, railings, rivers, building edges) to guide the viewer's eyes. Let AI help you analyze the leading lines in your photo:
I took a street photo, but it looks very flat. Please tell me how to use leading lines to improve the composition and make the image more three-dimensional.
Framing composition
Use elements like door frames, windows, tree branches as "frames" to enclose the subject in the middle. This naturally highlights the subject and adds depth to the image.
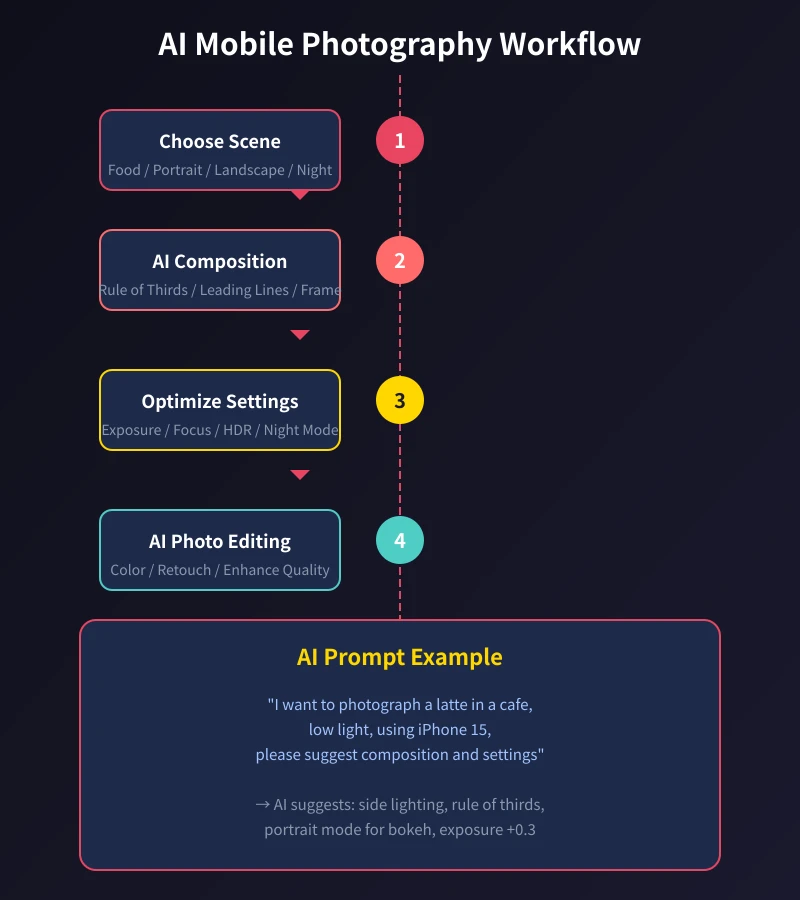
Step 2: Let AI help you optimize shooting settings
Modern phone cameras are getting more powerful, but many people only use auto mode. Here are a few key settings that AI can tell you how to adjust in different scenarios:
Exposure compensation
When shooting backlit portraits, faces tend to be dark. In this case, tap the screen to focus on the face, then swipe up to increase exposure (+0.3 to +0.7). AI suggests: it's better to slightly overexpose than underexpose, as it's easier to fix in post-processing.
HDR mode
HDR (High Dynamic Range) can preserve details in both bright and dark areas. It is recommended to turn it on in the following scenarios:
- Large brightness difference between sky and ground
- Shooting indoors near a window
- Backlit or side-lit scenes
Night mode
Most flagship phones have night mode. When using it, note:
- Keep steady: Hold with both hands, leaning against a wall or tabletop is better
- Wait: Stay still for 2-3 seconds after pressing the shutter
- Don't use flash: Flash will ruin the night atmosphere
Step 3: Practical tips for four major scenarios
Different shooting scenarios have different techniques. Here are AI tips for the four most common scenarios:
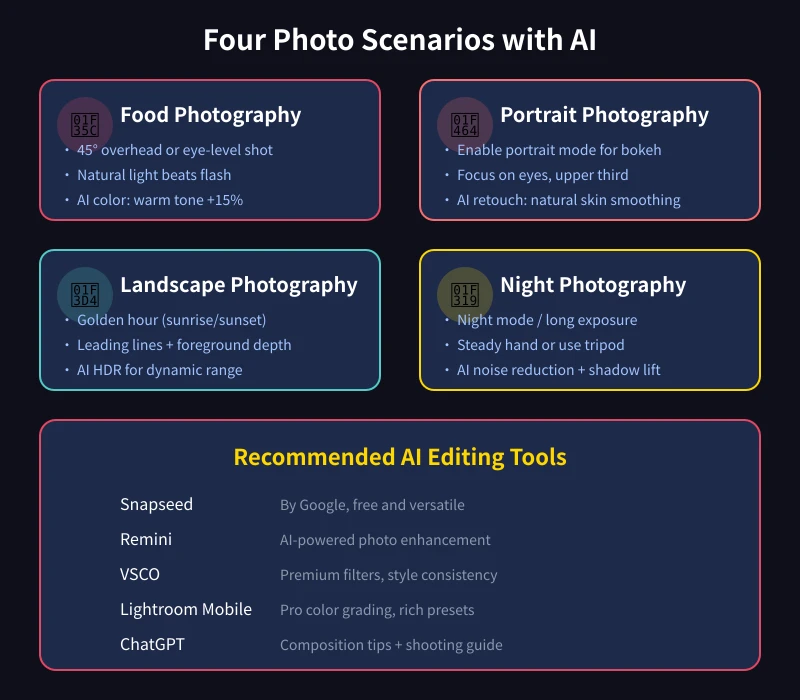
Scenario 1: Food photography
Taking food photos in cafes or restaurants is the most common phone photography scenario. AI suggestions:
- Angle: 45° overhead shot works for most foods; eye-level shot suits layered drinks
- Lighting: Sit near a window if possible, use natural light. Avoid overhead light and flash
- Composition: Food takes up 2/3 of the frame, leave 1/3 for table and utensils as environment
- Post-processing: Increase warm tones (color temperature +10-15%), boost saturation (+5-10%)
Scenario 2: Portrait photography
Taking photos of friends or family, AI helps you get a professional look:
- Portrait mode: Turn on portrait mode, background blur highlights the subject
- Catchlight: Have the person face a light source (window, streetlight) to get beautiful light spots in the eyes
- Distance: Don't get too close; 1.5-2 meters is best to avoid the big nose effect
- Post-processing: AI removes blemishes (acne, dark circles), but don't over-smooth the skin
Scenario 3: Landscape photography
When traveling for landscapes, AI helps you capture the best moments:
- Time: The "golden hour" is 1 hour after sunrise and 1 hour before sunset, when light is softest
- Foreground: Find a foreground element (flowers, rocks, railings) to add depth
- Sky: Sky should occupy at least 1/3 of the frame, more if clouds are rich
- Post-processing: Use AI HDR merging to enhance details in sky and ground
Scenario 4: Night photography
City nightscapes, neon lights, starry skies — AI helps you capture stunning effects:
- Equipment: Use a tripod if possible; otherwise, lean against a fixed object
- Mode: Turn on night mode; some phones support "Super Night" mode
- Composition: Use leading lines from lights (streets, bridges) to add depth
- Post-processing: AI noise reduction, brighten shadows but not too much (will look unnatural)
Step 4: Post-processing with AI tools
Taking the photo is only half the job; post-processing is equally important. Here are several useful AI photo editing tools and tips:
Recommended tools
- Snapseed (free): Made by Google, comprehensive features, supports local adjustments. Suitable for beginners.
- 醒图 (free): Chinese AI editing tool, one-click beautification works well, Chinese interface friendly.
- VSCO (partially free): Advanced filters, suitable for users who want a consistent style.
- Lightroom Mobile (partially free): Professional color grading tool, rich presets, top choice for advanced users.
- ChatGPT: Have AI analyze your photos and give specific editing suggestions.
Basic workflow for AI photo editing
No matter which tool you use, the basic steps are the same:
- Crop and correct: First adjust composition, remove unnecessary parts, correct horizon
- Adjust exposure: Overall brightness, contrast, highlights, shadows
- Adjust color: Color temperature (warm/cool), saturation, tone
- Local optimization: Adjust specific areas (e.g., brighten face, darken sky)
- Sharpen and denoise: Moderate sharpening for clarity, denoise to remove grain
Let AI give you specific editing parameters
Not sure how to adjust? Describe the photo to AI and let it give you specific parameter suggestions:
I took a city skyline photo in the evening. The sky is a bit gray, buildings are dark, and overall colors are not vibrant enough. Please give me specific Lightroom adjustment parameter suggestions.
AI will give you a complete list of parameters, such as "Exposure +0.5, Contrast +20, Highlights -30, Shadows +40, Color temperature warm 5500K, Saturation +15". Just follow them.
Advanced tips: Build your photography style with AI
After shooting for a while, you may want to develop your own photography style. AI can help you:
- Style analysis: Send your favorite photos to AI and have it analyze common characteristics (color tone, composition, subject)
- Preset creation: Create custom presets in Lightroom based on analysis results
- Continuous feedback: Have AI evaluate each edit to gradually refine your style
Notes
- Keep your phone lens clean: Wipe the lens with a soft cloth before shooting — this is the most overlooked factor that affects image quality
- Don't over-edit: AI editing tends to "overdo it"; keeping it natural is most important
- Shoot more and practice: Take 5-10 shots of the same scene, pick the best one
- Phone storage space: Enable HEIF/HEVC format to save space (no loss in quality)
- AI is not a cure-all: Good photos are 70% about capture and 30% about post-processing
Photography is a form of expression, and AI is your assistant, not a replacement. Once you master these skills, you'll find yourself starting to "see" those moments worth capturing. Starting today, arm your phone with AI and record every wonderful moment in life.
📖 Related Articles
AI Sleep Management Assistant: Track Sleep, Improve Routine, and Boost Sleep Quality
Struggling with sleep? This article shows you how to use AI tools to track sleep data, analyze sleep patterns, and create personalized improvement plans. From trouble falling asleep to waking up in the middle of the night, AI helps you find the root cause and continuously optimize—a sleep management guide that even beginners can use.
TutorialsAI Legal Assistant Guide: Contract Review, Rights Protection & Document Drafting Made Easy
Can't understand your lease? Don't know how to handle a workplace dispute? AI can help you review contracts, analyze legal issues, and draft legal documents. This guide covers three practical scenarios to turn AI into your personal legal advisor.
TutorialsAI Holiday Greetings and Social Etiquette: A Practical Guide for Greeting Generation, Gift Suggestions, and Occasion Management
Master AI social etiquette from scratch: five scenarios including holiday greetings, gift suggestions, polite refusals, apology repair, and gratitude expression. Step-by-step guidance on using AI to handle social situations effortlessly, just like having a personal social advisor.
💬 Comments are not yet available, stay tuned