Open WebUI Integration with Token Circle Complete Tutorial: Build Your AI Chat Platform
Open WebUI is one of the most popular open-source AI chat interfaces, supporting any OpenAI-compatible API service. This article will guide you step by step on how to connect Ciyuan Circle to Open WebUI and build your own AI chat platform in 5 minutes.
What is Open WebUI
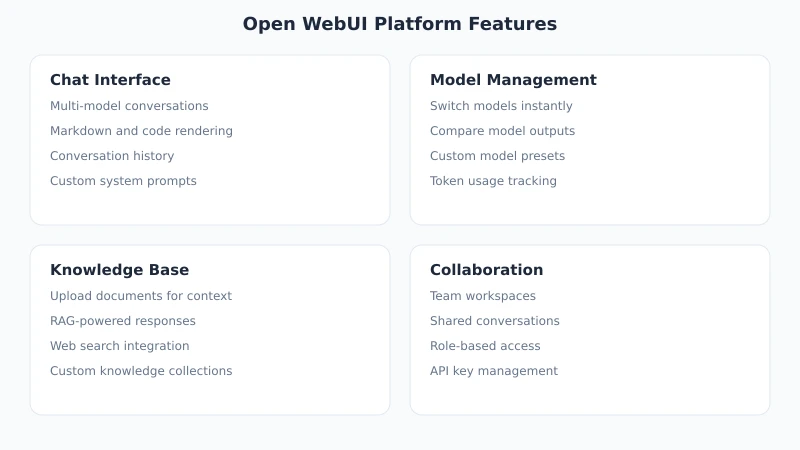
Open WebUI (formerly Ollama WebUI) is an extensible, feature-rich self-hosted web interface designed for interacting with large language models. It is fully compatible with the OpenAI API format, meaning you can directly integrate Ciyuan Circle's API into it and enjoy a fully functional AI chat platform.
Why choose Open WebUI?
- Completely free and open-source: Code hosted on GitHub, active community, continuous updates
- Web access: No client installation required, open in a browser and use, supports mobile access
- Multi-user support: Invite team members to use together, each with independent chat history
- Rich features: File upload, image recognition, conversation templates, web search, and more
- Data self-control: Deployed on your own server, conversation data does not pass through third parties
Prerequisites
Before you start, you need to prepare the following:
- A server or local computer: Recommended 2GB+ RAM, supports Docker or Python
- Docker installed (recommended): If Docker is not yet installed, refer to the official installation guide
- Ciyuan Circle account: Register at ciyuano.com/register
- An API key: Created in the Ciyuan Circle backend
Detailed Integration Steps
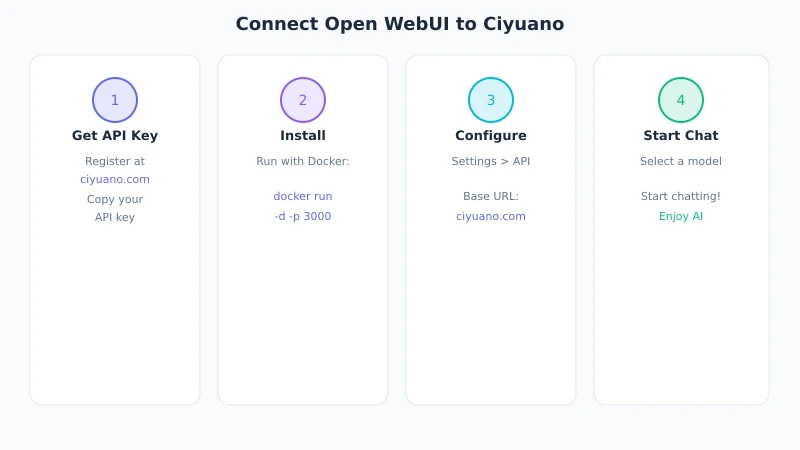
Step 1: Get Ciyuan Circle API Key
First, you need to create an API key in the Ciyuan Circle backend:
- Open your browser, visit www.ciyuano.com and log in
- Go to the backend, click "API Keys" in the left menu
- Click the "Create New Key" button
- Add a note name for the key (e.g., "Open WebUI") for easy management later
- Copy the generated key, format similar to
sk-relay-xxxxxxxxxx
Note: The key is displayed only once; be sure to save it securely. If lost, you can create a new one.
Step 2: Deploy Open WebUI
Docker deployment is recommended, can be done with a single command:
docker run -d -p 3000:8080 --add-host=host.docker.internal:host-gateway -v open-webui:/app/backend/data --name open-webui --restart always ghcr.io/open-webui/open-webui:main
Explanation of this command:
-d: Run container in the background-p 3000:8080: Map container's port 8080 to host's port 3000-v open-webui:/app/backend/data: Persist data to prevent loss after restart--restart always: Automatically start after server reboot
After deployment, open your browser and visit http://your_server_IP:3000. On first visit, you need to register an admin account.
No Docker? You can also install using Python: pip install open-webui, then run open-webui serve. However, the Docker method is recommended for stability and easier maintenance.
Step 3: Configure API Connection
This is the most critical step: connect Open WebUI to Ciyuan Circle's API:
- After logging into Open WebUI, click the avatar or settings icon in the bottom left corner
- Go to the "Settings" page
- Find the "Connections" tab
- In the OpenAI API configuration area:
- API Base URL fill in:
https://www.ciyuano.com/v1 - API Key fill in: your Ciyuan Circle key (sk-relay-xxx)
- API Base URL fill in:
- Click "Save"
Tip: If the connection is successful, you will see the list of available models load automatically. If nothing appears, check that the URL is correct (ends with /v1) and that the key is valid.
Step 4: Select a Model and Start Chatting
After configuration, you can use all models from Ciyuan Circle in Open WebUI:
- At the top of the chat page, click the model selection dropdown
- You will see all available models provided by Ciyuan Circle, such as DeepSeek V4, Qwen 3, MiMo v2.5, etc.
- Select a model, type your question, and start chatting
You can switch models at any time during a conversation to compare responses.
Advanced Configuration Suggestions
Set Default Model
If you frequently use a certain model, you can set it as default in Settings: go to Settings → General → Default Model, and choose your preferred model. This way, it will be automatically selected for each new conversation.
Custom System Prompt
Open WebUI supports setting a system prompt for each conversation, allowing the AI to work the way you want. You can:
- Add custom system prompts in the conversation settings
- Create "Prompt Presets" to switch between different AI roles with one click
- For example: translation assistant, code reviewer, copywriter, etc.
Multi-user Management
If you use Open WebUI in a team, the administrator can:
- Enable or disable new user registration
- Assign different model permissions to different users
- View usage statistics of all users
Common Troubleshooting
| Issue | Solution |
|---|---|
| Model list is empty | Check that the API Base URL is correctly filled, must end with /v1 |
| Prompt says API key is invalid | Confirm the key is correctly copied with no extra spaces; check if the key has expired or been disabled |
| Docker container unreachable | Check if firewall allows port 3000; cloud servers need to open it in security groups |
| Response speed is very slow | The model may be under high load; try switching to another model, or check your server's network quality |
| Error after uploading a file | Ensure the model you are using supports file input (e.g., DeepSeek V4, GPT-4o, etc.) |
Comparison with Other Clients
If you are still deciding which AI client to choose, here is a simple comparison:
| Feature | Open WebUI | Cherry Studio | LobeChat |
|---|---|---|---|
| Deployment method | Self-hosted Web | Desktop client | Self-hosted/Cloud |
| Multi-user | Native support | Not supported | Supported |
| Mobile access | Supported | Not supported | Supported |
| File upload | Supported | Supported | Supported |
| Best suited for | Team collaboration, self-hosted | Personal use, desktop | Personal/small team |
Summary
Open WebUI is a powerful, easy-to-deploy AI chat interface. Paired with Ciyuan Circle's API relay service, you can:
- Use multiple models like DeepSeek, Qwen, MiMo, GPT, etc. from a single interface
- Invite team members to use together, each managing their own conversations independently
- Access from mobile, tablet, or computer anytime
- Have complete control over your data
Next Steps: After deployment, try uploading a PDF file for the AI to summarize, or create a few conversation templates to boost productivity.
View Full API Documentation · Browse All Models · Open WebUI GitHub
Related Articles
AI-Powered PPT Presentations: Complete Guide from Outline to Layout
Creating PPTs with AI tools is as easy as having a conversation. This tutorial teaches you step-by-step how to generate professional presentations in three steps, with tool comparisons and prompt templates for beginners.
TutorialsAI Resume Writing Guide: Generate a Professional Resume in 3 Steps
Learn how to use AI to quickly generate professional resumes for fresh graduates, career changers, and career upgraders. Includes practical prompt templates, beginner-friendly.
TutorialsFamily Meal Planning with AI: Your Smart Assistant for Menu Design & Nutrition
Learn to use AI tools for weekly meal planning — from menu design to nutrition audits and shopping lists. A complete beginner-friendly guide with ready-to-use prompt templates.
Comments are not yet available, stay tuned